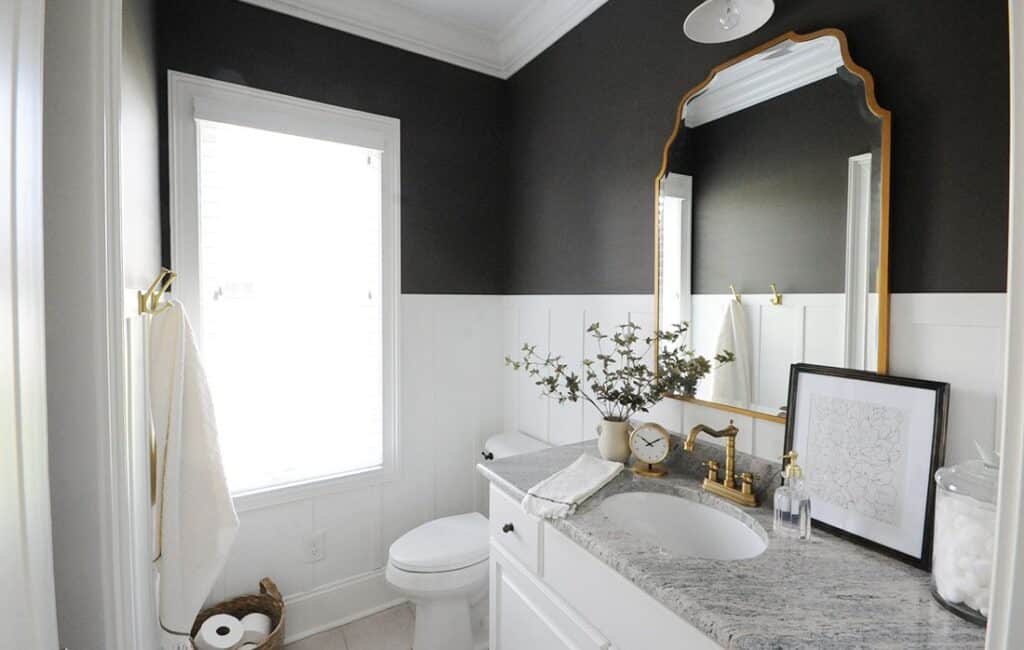
Calling all the décor aficionados who love to play with rustic touches and finishes, it’s time to embrace the raw allure of board and batten bathroom. It is a style that features a particular style of wall using wide boards placed vertically on the wall. Just like the Jack and Jill bathroom, this style is a bit different from the regular bathrooms, and cottage-style designs in the interior are opted for to give off a countryside vibe in contemporary bathrooms. So, in this article guide, we have meticulously crafted a guide to creating a board and batten-style bathroom incorporating rustic ideas. Without further ado, let’s get into the guide.

Board and Batten Style in the Bathroom
Folks, if you are an aesthetics admirer and love trying out new rustic ideas, we have got you covered. Although there is a wide assortment of rustic ideas to play with our bathroom interior, the one I am talking about here is the Board and batten one. Wide strips are used with narrow wooden strips called batten that cover the seams between the boards on the walls. As a result, a textured look is produced, which exudes rustic charm and raw allure.
By designing board-and-batten bathrooms, you can infuse your area with a sense of timeless elegance and architectural intrigue. This classic style, which alternates between wide boards and narrow battens, looks great in both traditional and modern spaces. So, let’s go through the guide for board-and-batten wall treatment.
Materials and Equipment Required
If you have made up your mind to display your creativity by working on board and batten bathroom walls, we are here with an ultimate guide. Here are some materials you need to start the DIY project.
Materials For Board and Batten Bathroom
1. Boards and Battens: Standard sizes for the vertical panels are 1×4 or 1×6 and for the battens, 1×2 or 1×3. Selecting the right sizes for board and batten bathroom is important for optimal results.
2. Primer and Paint: Pick paint and primer that are high-grade and appropriate for bathrooms.
3. Construction Adhesive: To keep the battens and boards in place.
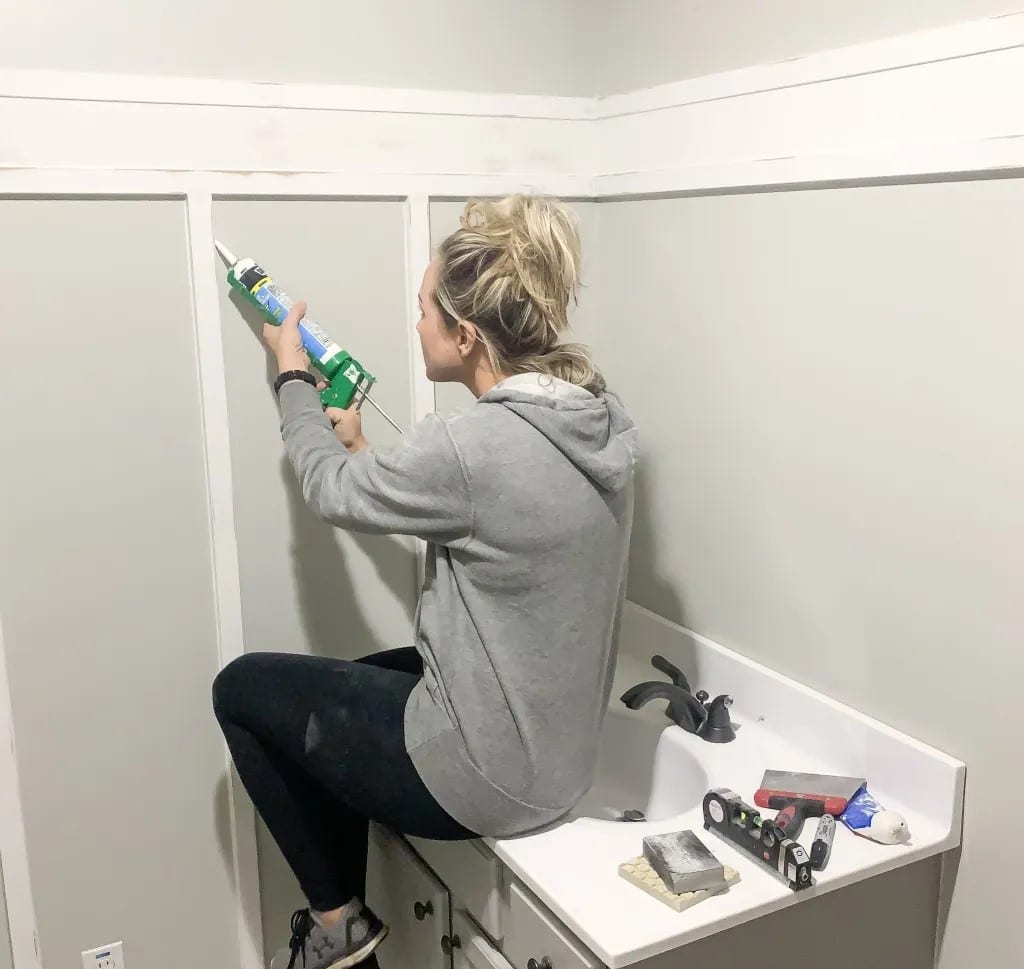
4. Caulk: For a modern appearance in the board and batten bathroom, it is important to provide a smooth finish and to fill in any gaps.
5. Wood Filler: To cover up flaws and nail holes.
6. Sandpaper: Different grits for surface finishing.
7. Screws or Nails: To fasten the battens and boards to the wall.
8. Trim: For the upper rail and any other ornamentation.
Step-by-Step Guide to Creating Board and Batten Bathroom Wall
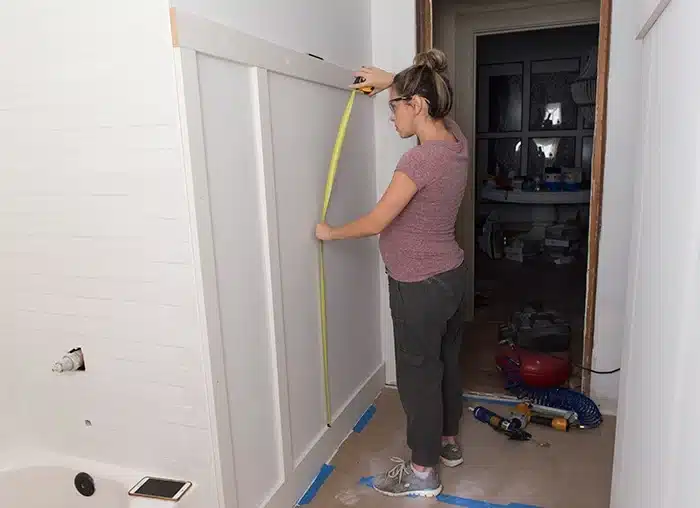
1. Measuring Tape: For precise measurements.
2. Level: To guarantee linearity and ensure smooth lines.
3. Miter Saw: To cut battens and boards.
4. Nail Gun: For fastening battens and boards.
5. Caulk Gun: It is used to apply caulk.
6. Rollers and Paint Brushes: For painting.
7. Stud Finder: Find the studs in the wall.
8. Pencil and Chalk Line: To indicate measurements and lines.
Detailed Instructions for Board and Batten Bathroom Style
Step 1: Arranging and Getting Ready
1.1. Layout for Design
- Take measurements of the walls where the board and batten wall are going to be installed.
- Draw a plan on paper, taking into account the batten spacing and board height.
- Select the wall treatment’s overall height, which should be between 32 and 48 inches off the ground.
1.2. Assemble Supplies
- Get all required instruments and supplies.
- Make sure, given your dimensions and design, that you have an adequate supply of battens and boards.
Step 2: Wall Preparation for Board and Batten Bathroom
2.1. Take Out Any Current Fixtures
- Remove any wall fixtures, including shelves, hooks, and towel bars.
- Consider taking out any baseboards if there are any on the walls so that the new boards are flush with the floor.
2.2. Clean and Mend the Walls
- Thoroughly clean the walls to get rid of oil and dust.
- Spackle to seal any cracks or holes, then smooth the area.
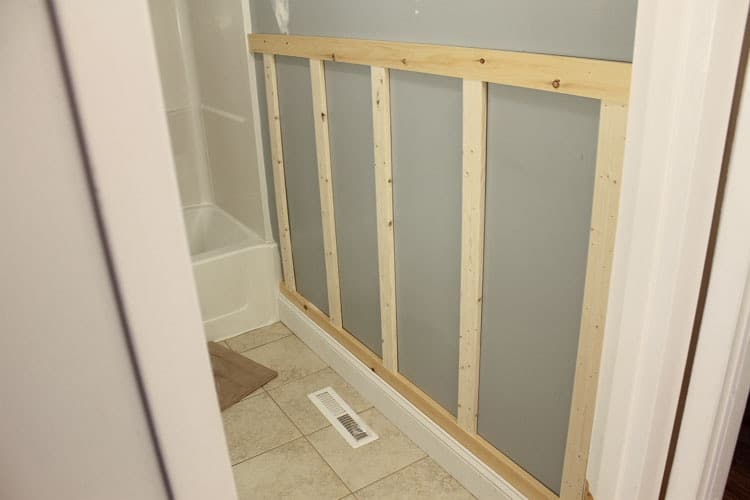
Step 3: Installing the Boards in Board and Batten Bathroom Style
3.1. Boards: Measure and Cut
- Determine the height of the DIY board and batten treatment.
- Cut the boards to the appropriate length using a miter saw.
3.2. Mount the Boards to the Wall
- Attach construction adhesive to every board’s reverse.
- Beginning at a corner, arrange the boards vertically on the wall.
- Make sure the boards are straight by using a level.
- Use a nail gun to fasten the boards by inserting brad nails into the wall studs.
3.3. Repeat this Step for Each Board
- Keep fastening the boards with equal spacing all the way along the wall to get a uniform appearance of board and batten bathroom style.
- To guarantee uniform spaces between boards, use a spacer.
Step 4: Batten Installation
4.1. Batten Measurement and Cutting
- Determine how far the top board is from the ground.
- With a miter saw, cut the battens to this length.
4.2. Attach Wall Battens
- Put construction adhesive on the battens’ backs.
- Place the battens across the spaces created by the boards.
- Make sure the battens are straight by using a level.
- Use a nail gun to glue the battens in place.
4.3. Continue with Every Batten
- Keep fastening battens all the way up the wall.
- Maintain uniform spacing for a consistent look.
Step 5: Installing the Top Rail and Trim
5.1. Top Rail Measurement and Cutting
- Determine the wall’s length and cut the top rail to suit.
- The top rail needs to rest horizontally atop the battens and vertical boards.
5.2. Mount the upper rail
- Add construction glue to the upper rail’s back.
- Make sure the top rail is level and positioned horizontally.
- Use screws or nails to fasten the top rail.
5.3. Add Ornamental Trim
- Add ornamental trim around the sides or beneath the top rail if desired.
- The trim pieces should be measured, cut, and fastened using glue and nails.
Step 6: Concluding Details
6.1. Close Gaps and Holes in Nails
- Fill nail holes and spaces between battens and boards with wood filler.
- Sand the filler smooth after letting it dry.
6.2. Caulk Seams
- Seal the joints where the battens and boards attach to the wall with caulk.
- Use a caulk tool or a moist finger to smooth the caulk.
6.3 Sand Surfaces
- Sand every surface to guarantee a glossy finish.
- Use a moist cloth to remove dust.
Step 7: Applying Paint for Final Touches in Board and Batten Bathroom
7.1. Prepare the Battens and Boards
- Prime every surface with a layer of adhesive.
- Allow the primer to fully dry.
7.2. Apply Paint to the Battens and Boards
- Apply the initial layer of paint using a roller or brush.
- Give the paint time to dry before adding another layer.
7.3. Closing Notes
- Retouch any sections that require more paint.
- Replace any fittings that have been removed, like towel bars and hooks.

Tips for a Project’s Success
Follow the tips mentioned below if you want to board and batten bathroom ideas to be a top-tier success.
1: Select Materials Resistant to Moisture.
Because bathrooms are often humid, choose battens and boards that won’t warp.
2. Use High-Quality Paint
Make sure the paint you choose is waterproof and resistant to regular cleaning in bathrooms.
3. Preserve Uniform Spacing in Board and Batten Bathroom
Use spacers to make sure the spaces between the boards and battens are uniform for a polished appearance.
4. Take Your Time
Give the installation process enough time. By taking your time, you can achieve a clean, accurate finish.
5. Protect Your Floors
Place down drop cloths or plastic sheeting to shield your floors from paint splatters and other debris.
6. Test Paint Colors
Examine the color of paint in various lighting settings on a small portion of the wall before deciding on it.
7. Consider Ventilation
Because bathrooms can get damp, it’s important to ensure that there is adequate ventilation in the space while painting in order to promote appropriate paint drying and minimize fumes.
8. Pre-Paint Board and Batten
Before installing, take pre-primed battens and boards into consideration. This can provide complete coverage and simplify the painting procedure.
9. Accurate Measurements
Precise proportions are essential for a smooth appearance. Before cutting, make sure all measurements are correct.
10. Practice Safety
Wear the proper protective gear, such as gloves and goggles, when cutting wood or working with adhesives or paint.
Do you know about a bathroom design that is somewhat similar to board and batten? The answer is a farmhouse bathroom. This design incorporates rustic touches with contemporary flair. You can check out detailed information on this design style in Ashley’s article.
Conclusion
Summing up, the article covered board and batten bathroom ideas in detail, entailing a step-by-step guide. It’s time to channel your inner creative enthusiast and work with this bathroom style to make your bathroom space look rustic yet contemporary. The above-mentioned guide will help you collect the right equipment and work on this project by yourself.
Rustic Charm!